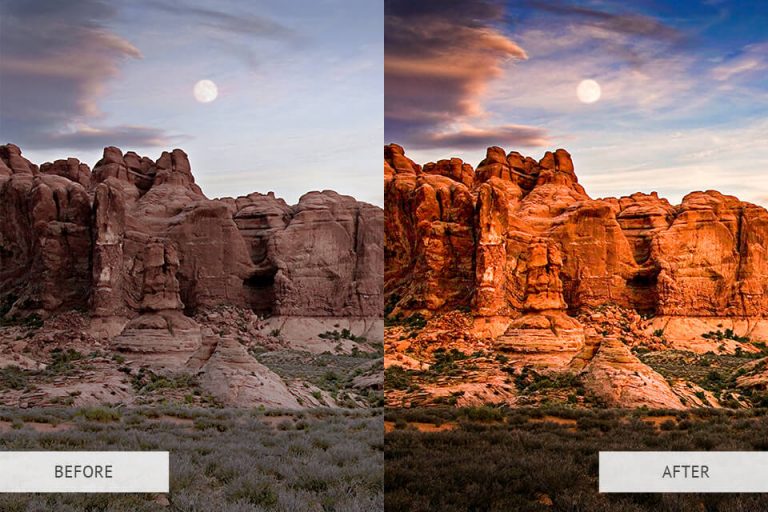
Follow these landscape photo editing tips and you can enhance your pictures in less than 10 minutes. All you need to do is install the latest version of Adobe Lightroom. With this program, you can perform a lot of actions: from colour correction to lighting adjustments.
Article provided through our partner FixThePhoto and contains affiliate links.
8 Top Landscape Photo Editing Tips
These tricks are useful for both beginners and professionals, who want to spend less time on landscape photo editing. With a few relatively quick and easy adjustments, you can liven up your landscapes, enhance lighting and colours, reduce noise, and much more.
1. Fix optical defects
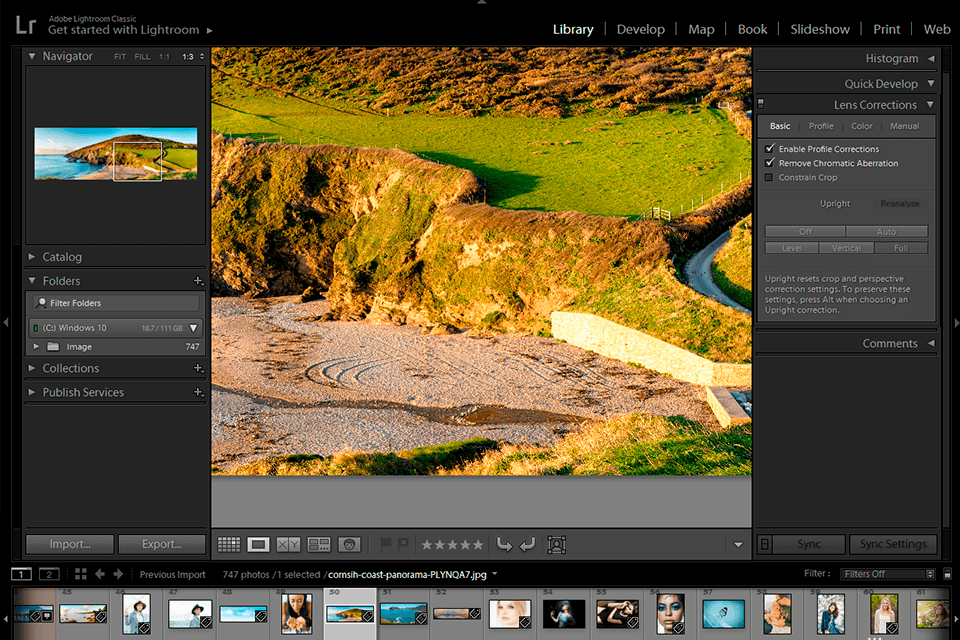
Use the Lens Corrections panel to fix lens flaws such as vignetting and distortion. Lightroom has a built-in list of lens profiles which makes this a quick and easy process. By ticking the Enable Profile Corrections box, the software will recognize the lens you used while taking photos. It does this through the embedded EXIF data and then will automatically make adjustments to compensate for the lens ’characteristics.
Such changes are especially noticeable in ultra-wide-angle shots. In some cameras, such corrections are made automatically. You also have the option to manually perform lens corrections by switching from Profile to Manual.
2. Remove chromatic aberration
There is also a Remove Chromatic Aberration (CA) checkbox on the Lens Corrections panel. This tool fixes an optical discrepancy that is usually manifested as coloured fringing along high contrast edges and is often a purple or green colour.
Chromatic Aberration can appear in pictures taken at sunrise or sunset, and show up near the edges of backlit or silhouetted objects. You can also correct CA manually with the help of the Dropper Tool.
If you want your landscape shots to look more professional, you can also take advantage of the photo retouching services. Experienced retouchers can improve images in 2-5 days, by focusing on your requirements.
3. Improve landscape photos with the cropping tool
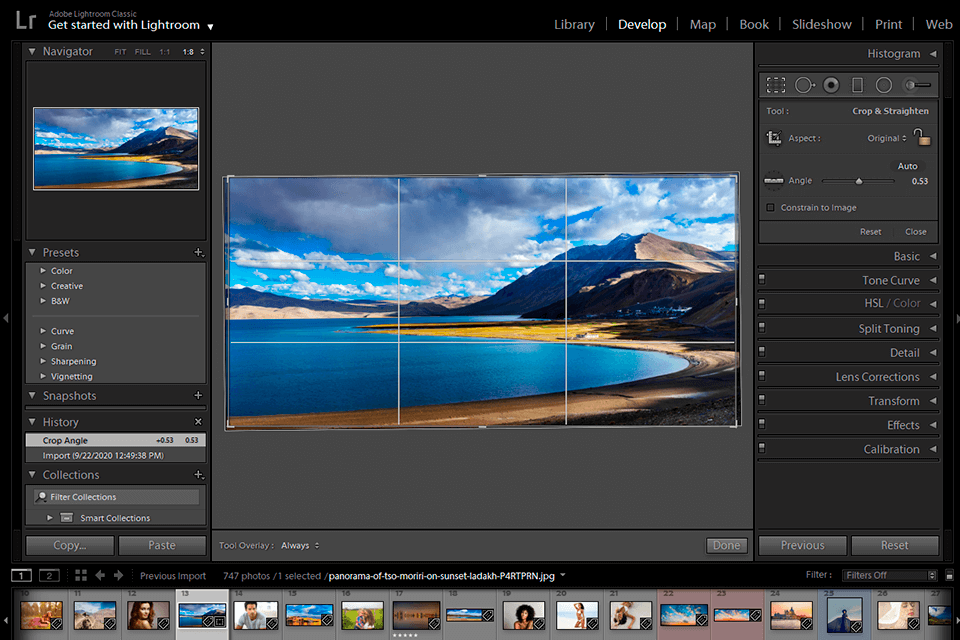
Another landscape photo editing trick is cropping. It helps improve balance and makes a photograph more harmonious. You can remove unnecessary objects from a photo or focus on the main element in the frame. You can also use this tool to straighten your images and ensure the horizon is aligned properly.
By clicking on the Crop Tool, you will see markers. If you want to resize a shot, you just need to click and drag the handles. You can use these handles without restriction, or enter the desired width and height data, creating a custom crop this way. To make things easier you can choose a popular crop size from a list of ready-made ones.
Besides, using the Crop Tool, you can align or “reposition” the horizon to one of the thirds (using the rule of thirds). You can “fill the frame” and remove space around your subject. You can also crop to get rid of undesired objects presented in the shot from both edges.
4. White Balance adjustments
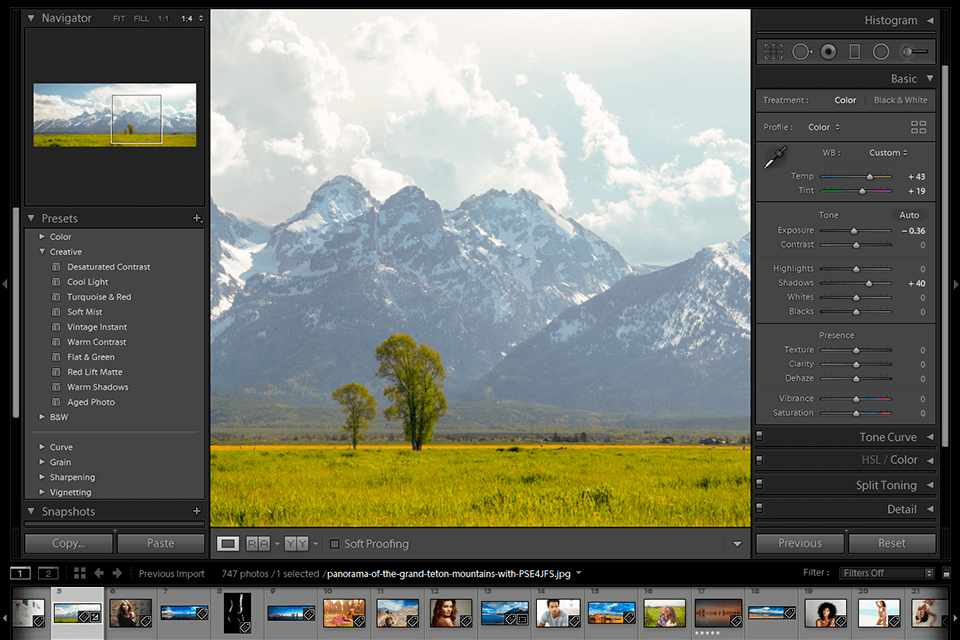
You can automatically adjust white balance (WB) in your camera and then change it in Lightroom. If you want to quickly change the WB, we recommend using the drop-down menu where you can choose from nine preset options including As Shot, Auto, Daylight, Cloudy, Shade, Tungsten, Fluorescent, Flash, and Custom. These parameters are intended to stimulate your camera’s white balance settings.
Alternatively, you can manually adjust the temperature and hue. Using the corresponding slider, you can completely change the temperature of a photo. Dragging the slider to the right makes the image warmer, and dragging it to the left makes the one cooler, which perfectly evens out the warm temperature in photos. If you want to increase/decrease the magenta or green shades in your photo, use the Tint slider.
By using these landscape photo editing tips to correct white balance, you can neutralize the colour tints produced by different light sources. Besides, white balance helps you warm-up or cool-down a picture that will affect its mood and make it look better.
5. Make the colours stand out (pop)
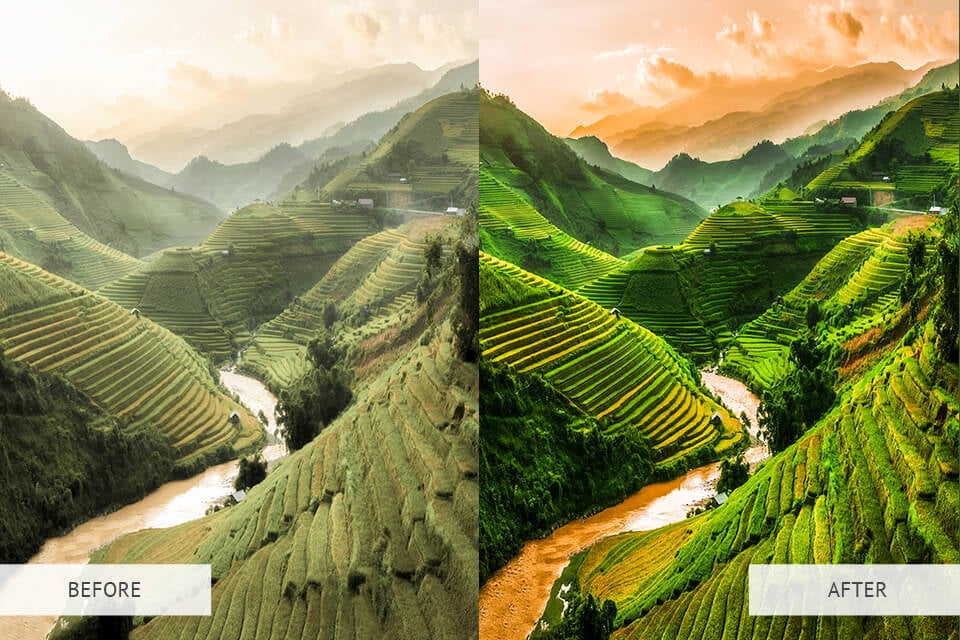
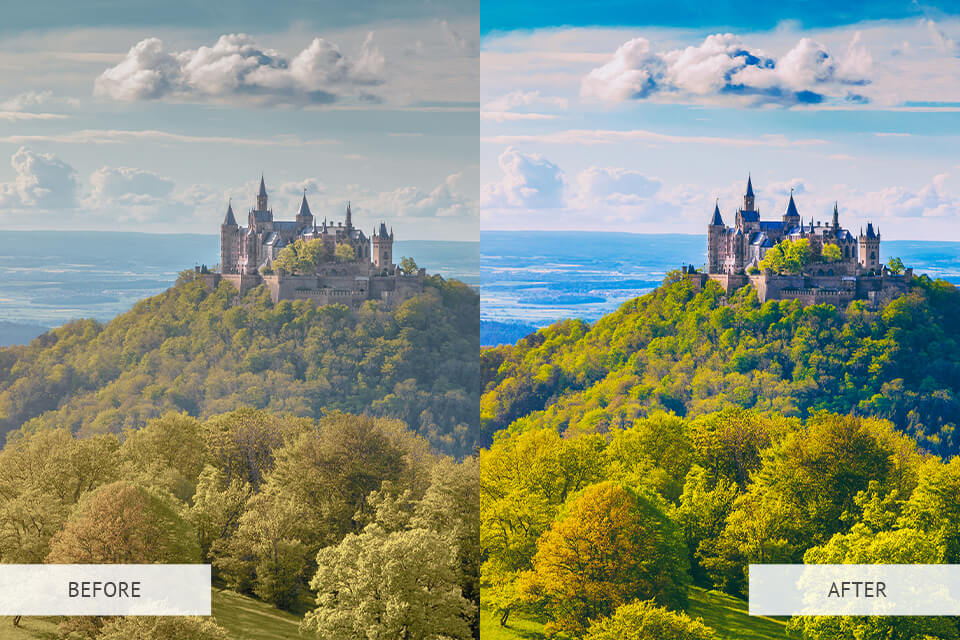
There are several ways to enhance colours in landscape photos. You can navigate to the HSL tab and the Hue section during the RAW conversion. This section allows you to change the tints in the picture. For example, you can change the green to blue so that it looks emerald instead of yellowish.
Besides, in the Luminance section, you can darken the blues and cyans, making the clouds brighter. When darkening a colour, its saturation is increased. So, once the darkening process is over, go to the Saturation tab and adjust this setting.
One more interesting trick is to use the Targeting Tool that can help you choose appropriate colours. You just need to activate the tool, click on any part of a picture, and drag your mouse either left or right.
Improving colours isn’t just about doing things manually. You can also use the landscape Lightroom presets, which help improve contrast in images and make the shades deeper. If you’re editing landscape photos in Photoshop, you can use colourful landscape PS actions that will add brightness and emphasise the beauty of the natural elements in your photos.
6. Create a shiny HDR image
To create a HDR (High Dynamic Range) image, you need to take multiple shots of the same landscape. This is often easily possible using the bracket modes available in some cameras and involves taking three or 5 (or more) images. One which is exposed for the shadows, another for the mid-tones and a final one for the highlights. You should also use a good travel tripod and timer on your camera to prevent handshake. Once you have these you can then use the Lightroom tools:
- During RAW conversion, you need to select several exposures in Lightroom, press Merge to HDR, and enjoy the result. Unfortunately, it doesn’t mean you’ll get the best results. Besides, it’s not suitable if you want to make a HDR picture from a single exposure after converting it twice with different values.
- Select the Quick Selection tool from the toolbar. Then select the sky. With the Alt+Click combination, you can deselect a portion of the selection or Shift+Click to add to it. The intensity of the selection depends on the radius of the circle. A small radius is perfect for small elements. After you have selected the objects, right-click, go to the Select and Mask tool and adjust the selection. Thanks to the Shift Edge slider, you can adjust the edges of the selection as well.
- You could also try the HDR Effect Lightroom presets to convert your photo to HDR. You will have 40 ready-made presets, which allow you to brighten the sky, add contrast to a picture, and emphasise the details. This will make a photo look impressive and full of detail.
7. Use adjustment brushes and the graduated filter
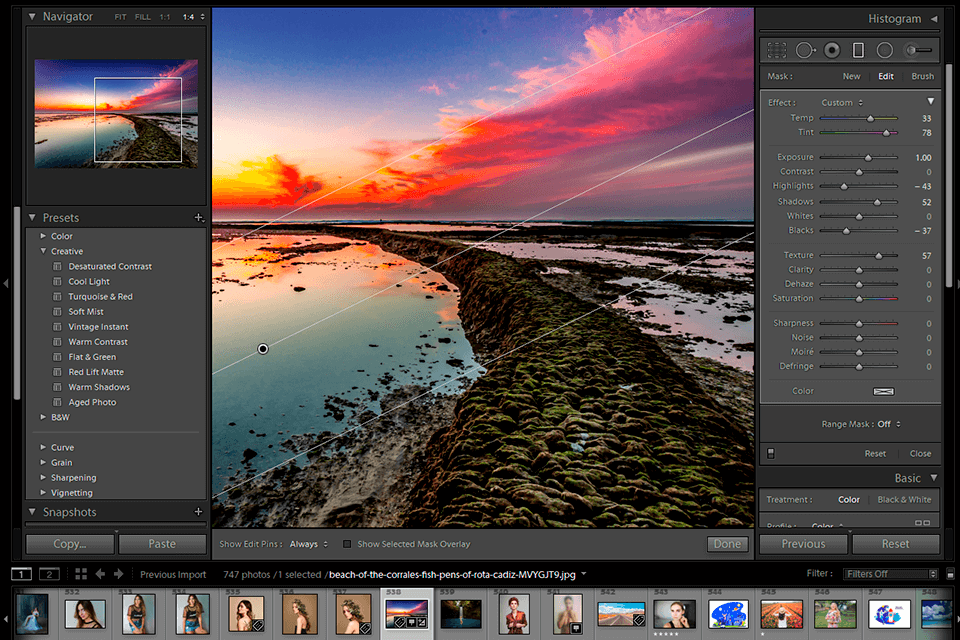
Sometimes in landscape photography you might find the skies are quite bright and don’t show much detail. To darken the sky or desaturate objects, a great tool to use is the graduated filter. Choose the Graduated filter icon under the Histogram (use the keyboard shortcut “M” for this). At the bottom, you’ll see the graduated filter panel, where the adjustable sliders are located.
Use this landscape photo editing tool to reach a gradient-like effect. Sometimes during editing, when you increase the saturation of the blues, objects nearby, such as trees, can also take on a blue tint. The graduated filter adds a little yellow to the image to discolour the trees.
Alternatively, you can use adjustment brushes. They can make some parts of the image lighter and others darker. This will help you achieve a nice contrast between light and dark areas.
8. Add energy to the landscape photograph
There are 5 really useful sliders on the base Lightroom panel named Texture, Clarity, Dehaze, Vibrance, and Saturation. With their help, you can quickly emphasize texture and change brightness of an image.
Clarity adds contrast to mid-tones, increases visible texture, as well as sharpness. It can be used to focus on wet rocks, sand, foliage and other details. Using the Saturation slider, you can either desaturate your landscape or saturate it with colours. First, the tool detects vibrancy and then increases the saturation of faded colours in the photo. We would recommend not adding too much saturation and vibrancy though as the colours will eventually look unrealistic.
Summary
We hope these tips help you with editing your landscape pictures. Of course it’s also important that you follow some of the best photography techniques when creating your images so that you have a good base to work with.
Another way to improve landscape photos, add sharpness and brightness is to use free Lightroom presets. You can add sunlight to pictures, enhance the brightness of the sky, water and greenery, as well as emphasise architecture and other details in a photo.
Noticed a mistake? Let us know.


